High-quality sensor data is a crucial requirement for Industry 4.0
The use of appropriate sensor technology in production is a basic prerequisite for the implementation of Industry 4.0. It collects data on process and machine status as it arises and makes it available for various process-relevant information services and workflows. However, the costs of sensor technology and the variety of possible applications often make it difficult for individual users to appreciate the direct economic benefit.

The VDMA has compiled a set of business tools in its Sensors for Industry 4.0 guideline. The aim of the guideline is to highlight various tools and methods for lowering sensor costs for the users and manufacturers of sensor systems. The publication features guiding questions and toolboxes. The guideline has been developed by VDMA Forum Industrie 4.0 in cooperation with the wbk Institute of Production Science of the Karlsruhe Institute of Technology (KIT) and a VDMA industrial working group consisting of 13 leading sensor manufacturers and users.
Determining lubrication requirements in ball screws using sensors
One of the main initiators of the guide is Prof. Jürgen Fleischer from wbk. “Sensors are the links between the digital and the real world and therefore one of the most important factors in the implementation of Industry 4.0. All higher-level data interpretation systems are blind without the right sensors,” says Fleischer.
He uses examples taken from KIT projects to show which data can usefully be captured and processed through the use of sensors: “Data can be captured in the drive components of machine tools in order to monitor their condition and optimise operation. In ball screws, for example, the axial force and the friction torque on the ball screw nut can be measured. The exact lubrication requirement can then be determined by comparing the results with a model for friction behaviour. This adaptive lubrication has significantly increased the service life of ball screws in tests at KIT.”
Different drive components, such as ball screws, can be monitored by capturing structure-borne noise. “These signals change over the lifetime of the component and thus allow conclusions to be drawn on the state of wear. The goal is predictive, condition-based maintenance, also known as predictive maintenance.” At EMO, wbk will be presenting a camera system in combination with a machine learning algorithm which makes it possible to monitor the wear condition of ball screws.
Software facilitates analysis of different types of data
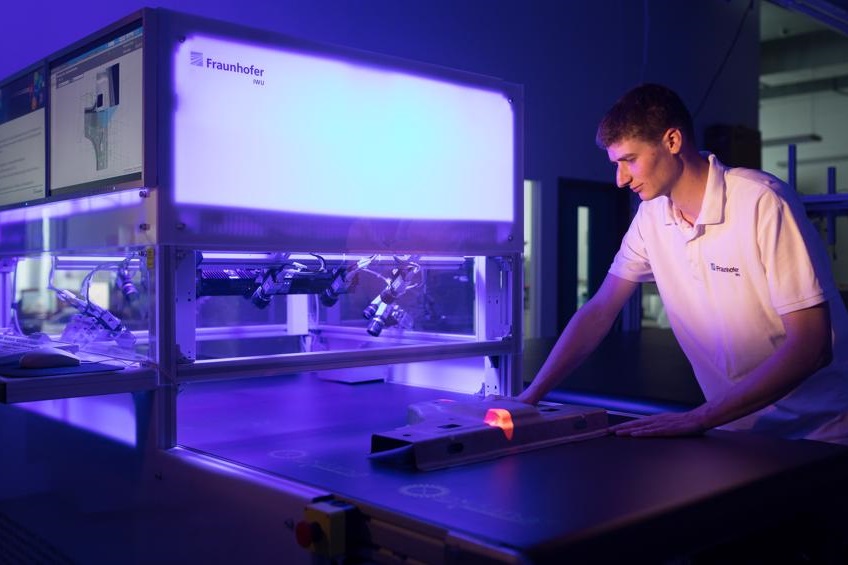
However, implementing algorithms for the analysis of sensor data and determining quality-relevant features suitable for automatic evaluation are often highly time-intensive. The Xeidana software, which was developed at the Fraunhofer Institute for Machine Tools and Forming Technology (IWU) in Chemnitz, provides users with a solution package that can take care of various tasks ranging from data acquisition to automated quality control.
The scientists record the quality-determining features of components, for example. The software is able to detect surface defects accurately and in real time using optical sensors (such as multi-camera systems). In a further step, it is planned to feed this data back to the production system in order to be able to respond in good time if the process parameters are breached, for example.
Further examples of the real-time capture of sensor data at the IWU include pressing, punching and cutting forces recorded in the tools of forming machines.
Correct interpretation of captured sensor data
Whether or not it is necessary to capture the sensor data in real time depends on the specific application. “You have to identify the point up to which real-time capture makes sense. There is also the question of how the data is synchronised. It’s also important to know which sampling rates are necessary to obtain a sufficiently accurate process description,” explains Dr. Jörg Stahlmann, Managing Director of Consenses GmbH in Roßdorf. The company supplies industrial measurement technology and digitalisation solutions. The use and development of suitable sensors and the interpretation of data are thus two of Consenses’ core competencies. “We use 3D step models to understand our customers’ designs. This is necessary in order to be able to classify the sensor data correctly, such as the expected force and temperature flows, and the kinematics. Understanding these relationships is important if we are to make any sense of the sensor data,” is how Stahlmann describes the Consenses approach.
Fleischer underlines this: “Simulations of components, assemblies and machines give us a better understanding of the mechanical effects encountered in production plants. We use this knowledge to make targeted use of sensors and to interpret the captured data more efficiently.”
Not every application requires real-time capture
On the subject of real-time, Stahlmann explains: “You should never assume that using real-time data always yields the best possible quality. Real-time data is often provided by control units which originally collected it to control certain machine actions.” This goal does not always overlap with the actual requirements for the sensor data. Before far-reaching analyses or decisions are derived from this data, it is therefore important to understand which signal is generated in each individual case.
Fleischer uses an example to explain when real-time recording is superfluous: “Condition-based maintenance does not require a rapid response to the collected data. Here, the results of the data evaluation may even be delivered several hours after the data has been entered. However, sensors are frequently used which yield dynamically changing signals, for example structure-borne sound signals. The recording of such signals requires a high sampling rate and very fast, real-time data capture. In this case, however, the recorded data can be stored in a buffer so that it can be aggregated and evaluated at a later point in time. In this case, the evaluation can also be outsourced to a powerful server.
Dr. Thomas Päßler, Group Manager Forming Machines at IWU, adds: “If there is no economic justification, there is no need for real time. For example, real-time capture is not necessary for trend analyses conducted over a longer period of time. It is not necessary to keep all the data; only individual parameters should be generated and archived. Production parameters such as output or energy data can be captured in real-time, but this is not necessary. In certain cases, for example, it is sufficient to take energy data readings every 15 minutes. In addition, there is little to be gained from capturing data required for management purposes in real time. These include parameters relating to the economic efficiency of production, such as how many components of a particular type were produced on one plant.”
In its Industriearbeitsplatz 2025 position paper, the German Academic Association for Production Technology (WGP) also addressed the question of meaningful and appropriate automation. It concludes: “All technical possibilities should be exploited in the economic value creation process. This does not mean, however, that maximum automation is always necessary or useful.”
Real-time data capture helps prevent damage
Real-time sensor data is inevitably necessary in cases of machine, tool or workpiece protection or process stability. As Päßler explains: “Real-time data capture is indispensable when it’s the only way to prevent damage to hardware or workpieces. This applies in the case of tool breakage or excessive stress on assemblies such as bearings or frame components, for example. In order to preclude the possibility of any rejects, it also makes sense to capture the material properties in real time with the appropriate sensors.”
Fleischer mentions another example of real-time data capture: “The real-time detection of anomalies in the production process can help avoid or limit damage. For example, errors made during the setup of machine tools or in the NC program can lead to collisions. If these are detected quickly enough, the machine can be stopped and the material damage reduced.”
Linked sensor data provides useful status parameters
Scientists at the IWU use real-time monitoring of forces, paths and stretching on forming presses, for example. However, these different types of data are not evaluated individually, as might be expected. They are fed into Smart Stamp, for example, a software-based analysis module. Here the data is merged and analysed. Is the press working within the normal range? Or does the ram on which the upper tool is mounted have a critical tilt which would result in sub-optimal forming of the workpiece, or the tool wearing out more quickly? “While individual pieces of sensor data are often meaningless in themselves, precise answers to such questions can be obtained by merging the data,” says Päßler.
Finally, there are points on the machine where it is not possible to mount real sensors – they would be difficult to access or installation would be too complicated and costly. As a result, there is sometimes no relevant data available for particular processes and machine states in production. The IWU solution here is to use virtual sensors. Real sensors, mounted at different points on the machine, serve as the basis for this. A digital twin in the form of a virtual sensor is created from their measured values. This calculates the values that a real sensor would record at a relevant but inaccessible location. “A good example is the deformation of a press frame: It can be shown very well using such a virtual sensor,” says Päßler. “In the EU project iMain we were able to show that the values calculated by our virtual sensor matched those of a real sensor very well.”
Author: Annedore Bose-Munde, specialist journalist from Erfurt
Size: around 10,800 characters including blanks
Downloads


